前言
在上一篇文章《Rust 实战教程之用 Rust 写一个命令行 TODO List(一)》 中,我们完成了项目的初始化,以及实现了基本的功能,但是还有一些问题和可优化的点,在这篇文章中,我们将继续完善这个项目。
没有看上篇的同学请先看上篇文章,上期代码在这里:todo-rs part-1
使用 clap 优化 CLI
之前我们是手动处理了命令行参数,接下来我们使用 clap 这个 crate 来优化我们的命令行。
首先在 Cargo.toml 中添加依赖:
[dependencies]clap = { version = "3.0", features = ["derive"] }这里使用了 clap 的 3.0 版本,目前最新的是 4.x,但是最新版失去了 help 信息的高亮功能,笔者没有找到解决办法,有知道的同学可以告诉我。
新建一个 cli.rs 文件,用来处理命令行参数:
use clap::{Parser, Subcommand};
#[derive(Parser)]#[clap(version, about)]#[clap(propagate_version = true)]pub struct Cli {    #[clap(subcommand)]    pub command: Commands,}
#[derive(Debug, Subcommand)]pub enum Commands {    #[clap(about = "Show rodo info.")]    Info,
    #[clap(about = "Add a todo item.")]    Add {        #[clap(help = "The item content to add.")]        content: Option<String>,    },
    #[clap(about = "Remove a todo item.")]    #[clap(visible_aliases = & ["rm"])]    Remove {        #[clap(help = "The item id to remove.")]        id: Option<String>,    },
    #[clap(about = "List all the todo items.")]    #[clap(visible_aliases = & ["ls", "ll", "la"])]    List,}
首先这里创建一个 Cli 结构体,用到了 #[derive(Parser)] 来为 Cli 结构体实现 Parser trait,这样我们就可以使用 Cli::parse() 方法来解析命令行参数了。注意要在 Cargo.toml 中添加 features = ["derive"]。
#[clap(version, about)] 会输出我们在 Cargo.toml 中定义的 version 和 about 字段。
#[clap(propagate_version = true)] 会将 version 信息传递给子命令。
#[clap(subcommand)] 会将 Commands 枚举中的所有命令作为子命令。
然后我们创建了一个 Commands 枚举,用来表示不同的命令。
#[clap(about = "xxx")] 会输出命令的相关说明。
#[clap(help = "xxx")] 会输出命令的帮助信息。
#[clap(visible_aliases = & ["xxx"])] 会为命令添加别名。
clap 还有很多用法,可以看它们的官方文档和示例。
接下来我们修改 main.rs 中的代码:
#[warn(unused_variables)]mod cli;mod database;
use clap::Parser;use cli::{Cli, Commands};use database::Database;
fn main() {    let args = Cli::parse();
    let mut db = Database::open(".rododb");
    match args.command {        Commands::Info => {            println!("Rodo is a simple todo list manager.");        }        Commands::Add { content } => {            if let Some(content) = content {                println!("Adding a todo item: {}", content);                let id = db.read_records().last().map(|r| r.id + 1).unwrap_or(1);                db.add_record(&database::Record { id, content });            } else {                println!("You need to specify the content of the todo item.");            }        }        Commands::Remove { id } => {            if id.is_none() {                println!("You need to specify the id of the todo item.");                return;            }            println!("Removing a todo item: {}", id.clone().unwrap());            db.remove_record(id.unwrap().parse::<i32>().unwrap());        }        Commands::List => {            let records = db.read_records();            if records.is_empty() {                println!("No records. You can add one with `rodo add [content]`");                return;            }            for record in records {                println!(" ⬜️ {}: {}", record.id, record.content);            }        }    }}
main.rs 中修改了之前手动处理命令行参数的代码,使用 Cli::parse() 来解析命令行参数,并且使用 Commands 枚举来处理不同的命令。
接下来我们运行一下看看效果:
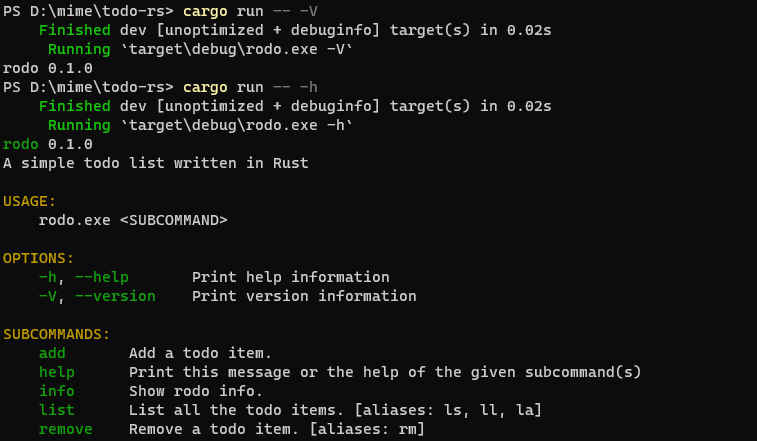
上图是分别执行cargo run -- -V 和 cargo run -- -h 的效果。
可以看到打印出了版本号和帮助信息,非常漂亮。
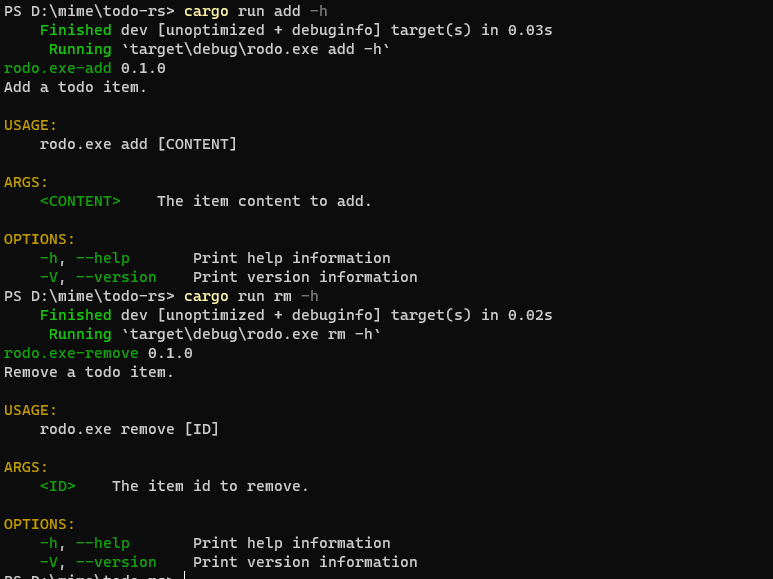
然后执行 cargo run add -h 和 cargo run rm -h ,可以看到也打印出了子命令的帮助信息。
优化代码结构及错误处理
优化完了命令行处理,接下来我们优化一下代码结构。
首先,我们的 database.rs 处理了一些业务输出,而且错误处理,我们期望 database.rs 只需要处理数据的读写,并返回成功失败就行。
对于 main.rs,我们希望它只作为一个入口,不处理业务逻辑,只负责调用其他方法。
先改造一下 database.rs,将错误处理和业务输出都移除,只保留数据读写的逻辑。
add_record 方法,删除之前的打印信息,返回一个 Result
pub fn add_record(&mut self, record: &Record) -> Result<(), std::io::Error> { let line = format!("{},{}\n", record.id, record.content); // writeln! 宏返回一个 Result,我们直接返回它 writeln!(self.file, "{}", line) }remove_record 返回一个 Result
pub fn remove_record(&mut self, id: i32) -> Result<(), std::io::Error> { let reader = BufReader::new(&self.file); let mut lines = reader.lines().enumerate(); let line = lines.find(|(_, line)| { let record = parse_record_line(line.as_ref().unwrap()); record.id == id }); match line { Some((i, _)) => { let contents = fs::read_to_string(".rododb").unwrap(); let new_contents = contents .lines() .enumerate() .filter(|(j, _)| *j != i) .map(|(_, line)| line) .collect::<Vec<_>>() .join("\n"); self.file.seek(std::io::SeekFrom::Start(0)).unwrap(); self.file.write_all(new_contents.as_bytes()).unwrap(); self.file.set_len(new_contents.len() as u64).unwrap(); Ok(()) } // 未找到 id 对应行时返回一个错误 None => Err(std::io::Error::new( std::io::ErrorKind::Other, format!("No such record: {}", id), )), } }接下来创建 commands.rs 来处理各种命令,调用数据库方法,并处理错误。
use crate::database::{Database, Record};use std::io;
// Show rodo infopub fn info() -> Result<(), io::Error> {    println!("Rodo is a simple todo list manager.");    Ok(())}
// Add a todo itempub fn add(db: &mut Database, content: Option<String>) -> Result<(), io::Error> {    if let Some(content) = content {        println!("Adding a todo item: {}", content);
        let id = db.read_records().last().map(|r| r.id + 1).unwrap_or(1);
        db.add_record(&Record {            id,            content: content.clone(),        })?;        println!("📝 Item added: {}", content);        Ok(())    } else {        eprintln!("You need to specify the content of the todo item.");        std::process::exit(1);    }}
// Remove a todo itempub fn remove(db: &mut Database, id: Option<String>) -> Result<(), io::Error> {    if id.is_none() {        println!("You need to specify the id of the todo item.");        std::process::exit(1);    }    println!("Removing a todo item: {}", id.clone().unwrap());    db.remove_record(id.unwrap().parse::<i32>().unwrap())?;    println!(" ❌ Item removed!\n");    Ok(())}
// List all todo itemspub fn list(db: &mut Database) -> Result<(), io::Error> {    let records = db.read_records();    if records.is_empty() {        eprintln!("No records. You can add one with `rodo add [content]`");        std::process::exit(1);    }    for record in records {        println!(" ⬜️ {}: {}", record.id, record.content);    }    Ok(())}
这里其实是把 main.rs 中的代码拆分出来,然后调用 database.rs 中的方法,打印业务信息,并处理错误向上传播。
main.rs 就变成了这样:
mod cli;mod commands;mod database;
use clap::Parser;use cli::{Cli, Commands};use database::Database;
fn main() {    let args = Cli::parse();
    let mut db = Database::open(".rododb");
    // 匹配命令调用    let result = match args.command {        Commands::Info => commands::info(),        Commands::Add { content } => commands::add(&mut db, content),        Commands::Remove { id } => commands::remove(&mut db, id),        Commands::List => commands::list(&mut db),    };
// 统一处理错误 if let Err(err) = result { eprintln!("\x1b[31merror:\x1b[39m {}", err); std::process::exit(1); }}Ok,到此我们的项目结构基本定型了,main.rs 作为主入口,cli.rs 是命令行处理,commands.rs 是命令处理,database.rs 是数据读写。
db 文件存储位置
还有最后一个问题,我们目前的 db 文件是存储在项目根目录的,我们希望它能存储在用户目录下。
windows 在 C:\Users\<your_username>下,macOS 在 /Users/<your_username> 下。
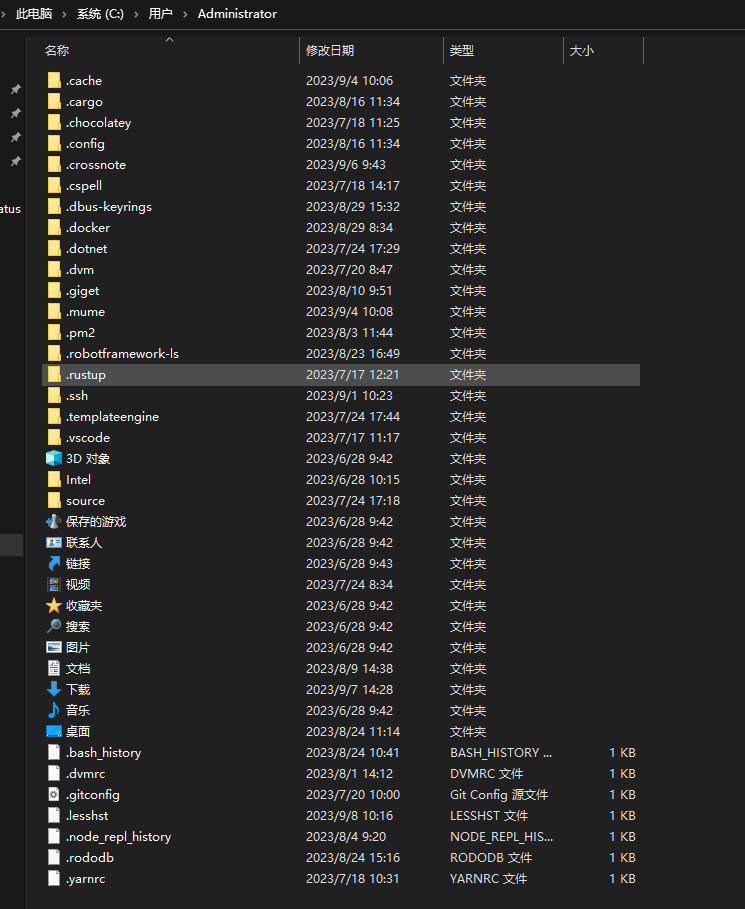
上图是我的 windows 电脑的用户目录,可以看到我们熟悉的各种文件都在这里。同样还有我们的 .rododb 文件,我们希望它能存储在这里。
这里我们使用 dirs 这个 crate,它可以帮助我们获取用户目录。
先安装:
[dependencies]dirs = "5.0.0"我们新建一个 utils.rs 文件,用来处理配置文件相关:
use dirs::home_dir;use std::fs;
// 定义常量,代码量大之后,也可以单独放到一个文件中pub const RODO_DB_FILENAME: &str = ".rododb";
// 获取 db 文件路径pub fn get_db_file_path() -> std::path::PathBuf {    home_dir()        .map(|it| it.join(RODO_DB_FILENAME))        .unwrap_or_default()}
/// 检查 db 文件是否存在pub fn db_exists() -> bool {    let dir = get_db_file_path();    fs::metadata(dir).is_ok()}
// 创建 db 文件pub fn create_db_file() -> std::io::Result<()> {    let dir = get_db_file_path();    fs::File::create(dir)?;    Ok(())}
// 检查db文件是否存在,不存在就创建pub fn check_db_file() -> std::io::Result<()> {    if !db_exists() {        create_db_file()?;    }    Ok(())}
一共四个函数,简单明了,分别用来获取 db 文件路径,检查 db 文件是否存在,创建 db 文件,检查并创建 db 文件。
dirs::home_dir() 会直接返回用户目录的 PathBuf,然后我们使用 join 方法拼接上我们的 db 文件名,就得到了 db 文件的路径。
然后修改我们其他文件中的 db 文件路径:
先看 database.rs
use crate::utils::{check_db_file, get_db_file_path};
// 修改一下 open 方法pub fn open() -> Database {    // 先检查 db 文件是否存在,不存在就创建    check_db_file().unwrap();
    // 获取 db 文件路径    let db_file = get_db_file_path();
    let file = OpenOptions::new()        .create(true)        .read(true)        .write(true)        .open(db_file) // 这里传入 db 文件路径        .unwrap();    Database { file }}
remove_record 方法中读取文件的代码也要改一下:
// 之前:let contents = fs::read_to_string(".rododb").unwrap();
// 之后:let db_file = get_db_file_path();let contents = fs::read_to_string(db_file).unwrap();
然后改一下 main.rs:
mod utils;
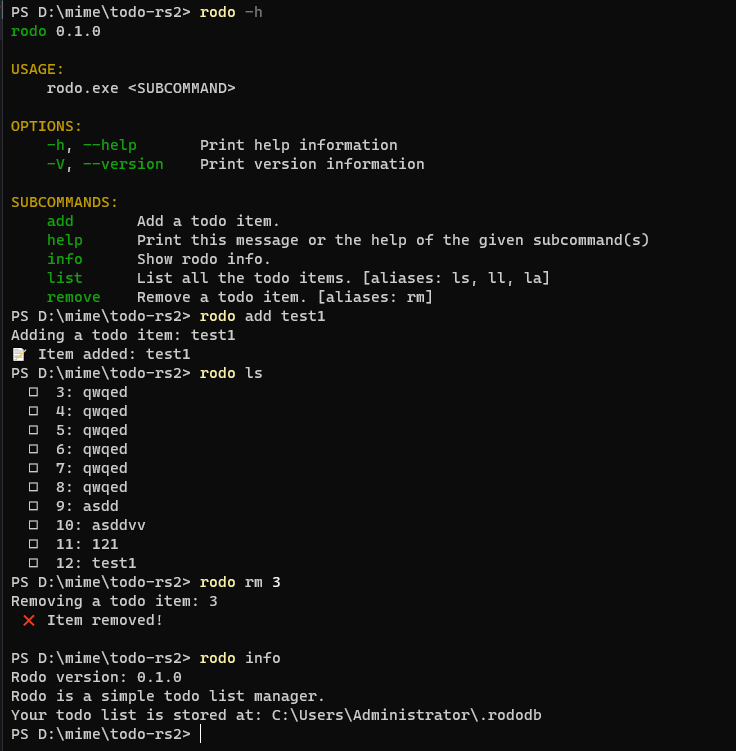
// 去掉 open 方法的参数即可let mut db = Database::open();我们重新执行 cargo run,可以看到 db 文件已经存储在用户目录下了。
最终效果:
总结
到这里,我们就用 Rust 开发了一个命令行工具,用于在终端记录 todo list。
在本项目中我们学到了:
- Rust 的 match pattern
- Rust 中的文件读写
- Rust 中的错误处理
- 如何使用
clapcrate 来处理命令行参数 dirscrate 的使用
功能做完了,事情还没完,后续文章:
- Rust 的一些配置,及如何在 vscode 中调试 Rust 程序
- 如何打包和发布这个命令行程序
- 如何写 Rust 单元测试
这个项目的代码我已经上传到 GitHub,欢迎大家 star 和 fork,也可以贡献代码,对于本篇文章有任何疑问,欢迎在 GitHub 上提 issue。有错误的地方,欢迎指正。
往期文章
liruifengv2333,进群交流,抱团取暖。
- 新生代程序员群
- Astro 学习交流群
SayHub,带来更多原创内容。 很高兴见到你,欢迎来玩儿~