前言
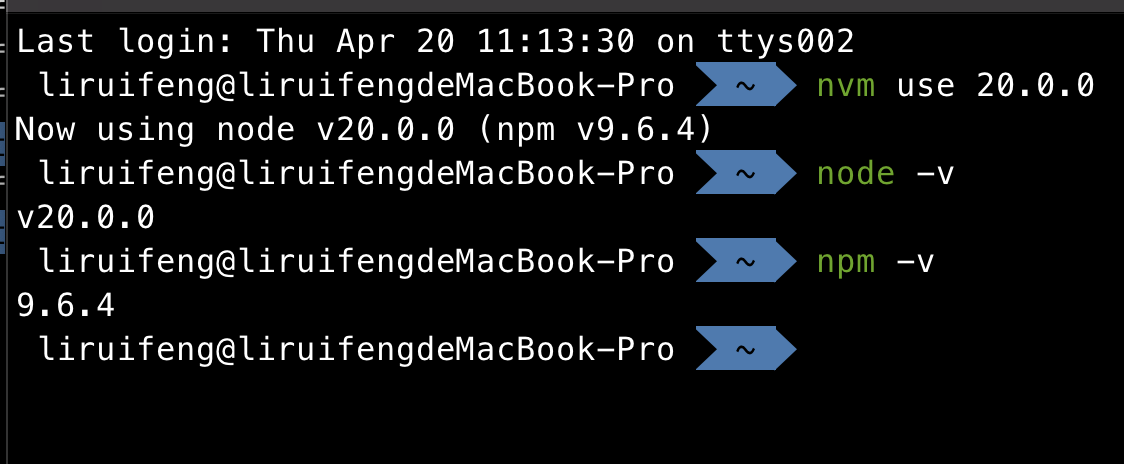
4 月 18 日,Node.js 正式发布了 v20 版本,你个人或者公司在用哪个版本呢?
先看 changelog: https://github.com/nodejs/node/blob/main/doc/changelogs/CHANGELOG_V20.md#20.0.0
总结一下主要改动:
-
在 Node.js 中实现了权限模型(实验性),熟悉 Deno 的人应该很耳熟。
-
自定义 ESM loader hooks 接近稳定版。
-
同步化
import.meta.resolve() -
V8 引擎升级到 11.3
-
稳定版 Test Runner
-
最新版本的 URL 解析器 Ada 2.0
-
通过注入 Blob 来准备单个可执行文件
-
Web Crypto API 的优化
-
官方支持 ARM64 Windows
-
在 Node.js V20 中,必须指定 WASI 的版本
-
性能优化(被 bun 卷了)
搞起来

下面就我感兴趣的两个点进行详细介绍和代码实践。
权限模型
V20 版本实现了一个权限模型,目前还是实验性。它允许开发人员在程序执行期间限制对特定资源的访问,例如文件系统操作、子进程生成和工作线程创建。
需要使用--experimental-permission标志来启用,启用后将限制对所有可用权限的访问。 通过使用此功能,开发人员可以防止他们的应用程序访问或修改敏感数据或运行可能有害的代码。
熟悉 Deno 的同学知道 Deno 的一个特性就是提供安全的权限沙箱,是 Deno 的一大卖点,现在也要被 Node 追平了。
在 Deno 中,可以使用 --allow-read 标志来给 mod.ts 授予对文件系统的只读访问权限。它不能执行写入文件。
deno run --allow-read mod.tsDeno 的详细权限列表:https://deno.land/[email protected]/basics/permissions
Node.js 的权限模型也是类似的,只不过 Node.js 的权限模型是通过实验性标志来开启。
Node 的权限模型第一个版本有以下功能:
--allow-fs-read和--allow-fs-write:限制文件系统的访问(读写)--allow-child-process: 限制对child_process的访问--allow-worker: 限制对worker_threads的访问- 限制对本机插件的访问(与
--no-addons标志相同)
当使用 --experimental-permission 标志启用权限模型之后,以上权限都会被限制。
同时,将会给运行时的 process 加上一个 process.permission.has 方法,用来检查是否有权限。
我们来实战一下,写下以下 JS 代码:
const fs = require("fs");
console.log("test");
const canWrite = process.permission.has("fs.write");const canWriteTest = process.permission.has("fs.write", "/Users/liruifeng/");
console.log("canWrite:", canWrite);console.log("canWriteTest:", canWriteTest);
const canRead = process.permission.has("fs.read");const canReadTest = process.permission.has("fs.read", "/Users/liruifeng/");
console.log("canRead:", canRead);console.log("canReadTest:", canReadTest);
fs.readFile("./test.txt", "utf-8", (err, data) => {  if (err) return console.log("err:", err);  console.log("data:", data);});
执行:
node --experimental-permission index.js此时我们使用了 --experimental-permission 标志,但是没有指定权限,所以会出现以下报错:
$ node --experimental-permission index.jsnode:internal/modules/cjs/loader:171  const result = internalModuleStat(filename);                 ^
Error: Access to this API has been restricted    at stat (node:internal/modules/cjs/loader:171:18)    at Module._findPath (node:internal/modules/cjs/loader:627:16)    at resolveMainPath (node:internal/modules/run_main:19:25)    at Function.executeUserEntryPoint [as runMain] (node:internal/modules/run_main:76:24)    at node:internal/main/run_main_module:23:47 {  code: 'ERR_ACCESS_DENIED',  permission: 'FileSystemRead'}
给 /Users/liruifeng/ 文件夹加上读取权限:
node --experimental-permission --allow-fs-read=/Users/liruifeng/ index.js输出如下:
testcanWrite: falsecanWriteTest: falsecanRead: falsecanReadTest: true(node:15876) ExperimentalWarning: Permission is an experimental feature(Use `node --trace-warnings ...` to show where the warning was created)data: test可以看到我们写的process.permission.has('fs.read', '/Users/liruifeng/')这个方法返回了true,说明我们有读取权限。
并且下面成功用fs.readFile读取了文件内容。
我们加个写的方法试试:
fs.writeFile("./test.txt", "test write", err => { if (err) return console.log("err:", err); console.log("write success");});再次执行:
node --experimental-permission --allow-fs-read=/Users/liruifeng/ index.js报错了,因为我们只给了读权限,没有给写权限。
testcanWrite: falsecanWriteTest: falsecanRead: falsecanReadTest: truenode:fs:568  binding.open(pathModule.toNamespacedPath(path),          ^
Error: Access to this API has been restricted    at Object.open (node:fs:568:11)    at Object.writeFile (node:fs:2215:6)    at Object.<anonymous> (/Users/liruifeng/Desktop/opensource/mime/index.js:22:4)    at Module._compile (node:internal/modules/cjs/loader:1267:14)    at Module._extensions..js (node:internal/modules/cjs/loader:1321:10)    at Module.load (node:internal/modules/cjs/loader:1125:32)    at Module._load (node:internal/modules/cjs/loader:965:12)    at Function.executeUserEntryPoint [as runMain] (node:internal/modules/run_main:83:12)    at node:internal/main/run_main_module:23:47 {  code: 'ERR_ACCESS_DENIED',  permission: 'FileSystemWrite',  resource: '/Users/liruifeng/Desktop/opensource/mime/test.txt'}
使用 “—allow-fs-write` 来给写权限:
node --experimental-permission --allow-fs-read=/Users/liruifeng/ --allow-fs-write=/Users/liruifeng/ index.js成功了,输出如下:
testcanWrite: falsecanWriteTest: truecanRead: falsecanReadTest: true(node:16424) ExperimentalWarning: Permission is an experimental feature(Use `node --trace-warnings ...` to show where the warning was created)write successdata: test write查看文件内容,发现也成功写入了。
单个可执行文件
此功能同样是实验性的,可以将 Node.js 代码打包成单个可执行文件,使得在未安装 Node.js 的机器上也可以运行。
实战一下:(以下操作均在 Mac 运行,windows 请自行阅读 https://nodejs.org/api/single-executable-applications.html )
我们先创建一个 hello.js 文件:
console.log(`Hello, ${process.argv[2]}!`);在创建一个 sea-config.json 文件:
{ "main": "hello.js", "output": "sea-prep.blob"}执行:
node --experimental-sea-config sea-config.json此时会生成一个 sea-prep.blob 文件。
然后我们创建可执行文件的副本 node 并根据需要命名:
cp $(command -v node) hello删除二进制文件的签名:
codesign --remove-signature hello把上面生成的 sea-prep.blob 注入到二进制文件:
npx postject hello NODE_SEA_BLOB sea-prep.blob \ --sentinel-fuse NODE_SEA_FUSE_fce680ab2cc467b6e072b8b5df1996b2 \ --macho-segment-name NODE_SEA签名:
codesign --sign - hello运行
./hello liruifengHello, liruifeng!(node:17668) ExperimentalWarning: Single executable application is an experimental feature and might change at any timeOk,我们成功打包了一个可以在未安装 Node.js 的机器上执行的二进制文件。
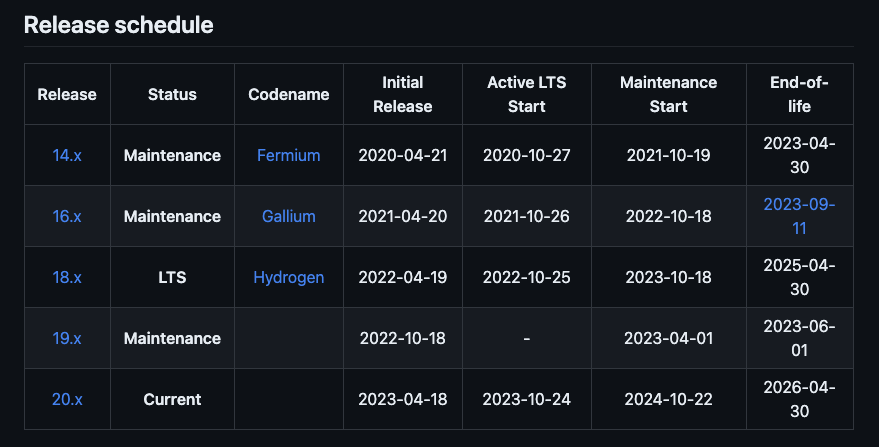
版本时间表

上面是 Node.js 官方的版本维护时间表。
注意 14.x 这个月底就停止维护了。
目前的 LTS 是 18.x,但是 V20 将在今年 10 月成为 LTS。
详情看:https://github.com/nodejs/Release
总结
Node 现在被 Deno 和 Bun 卷的厉害,Deno 的现代化 Web 标准,Bun 的性能。Node 现在迅猛追赶,相信 JS 生态会越来越好。

