前言
作为一个前端开发工程师,拥有自己的服务器和网站是必不可少的,网站默认是使用 HTTP 协议,要使用 HTTPS 需要申请证书,而证书也不太便宜。今天就教大家使用 Certbot 来申请免费的 HTTPS 证书。
以下所有操作均运行在 Centos 服务器。
安装 Certbot
yum install epel-release -yyum install certbot -y申请证书
域名分为主域名 test.com 和泛域名 *.test.com。
理论上泛域名证书可以同时用在主域名和泛域名上面,不知道为什么我的主域名用了泛域名的证书,chrome 提示我的证书无效。 于是我分开申请了两个证书,有知道解法的同学告知一下。
执行以下命令:
# 泛域名:certbot certonly -d *.test.com --manual --preferred-challenges dns
# 主域名:certbot certonly -d test.com --manual --preferred-challenges dns
这时会出现下图的界面
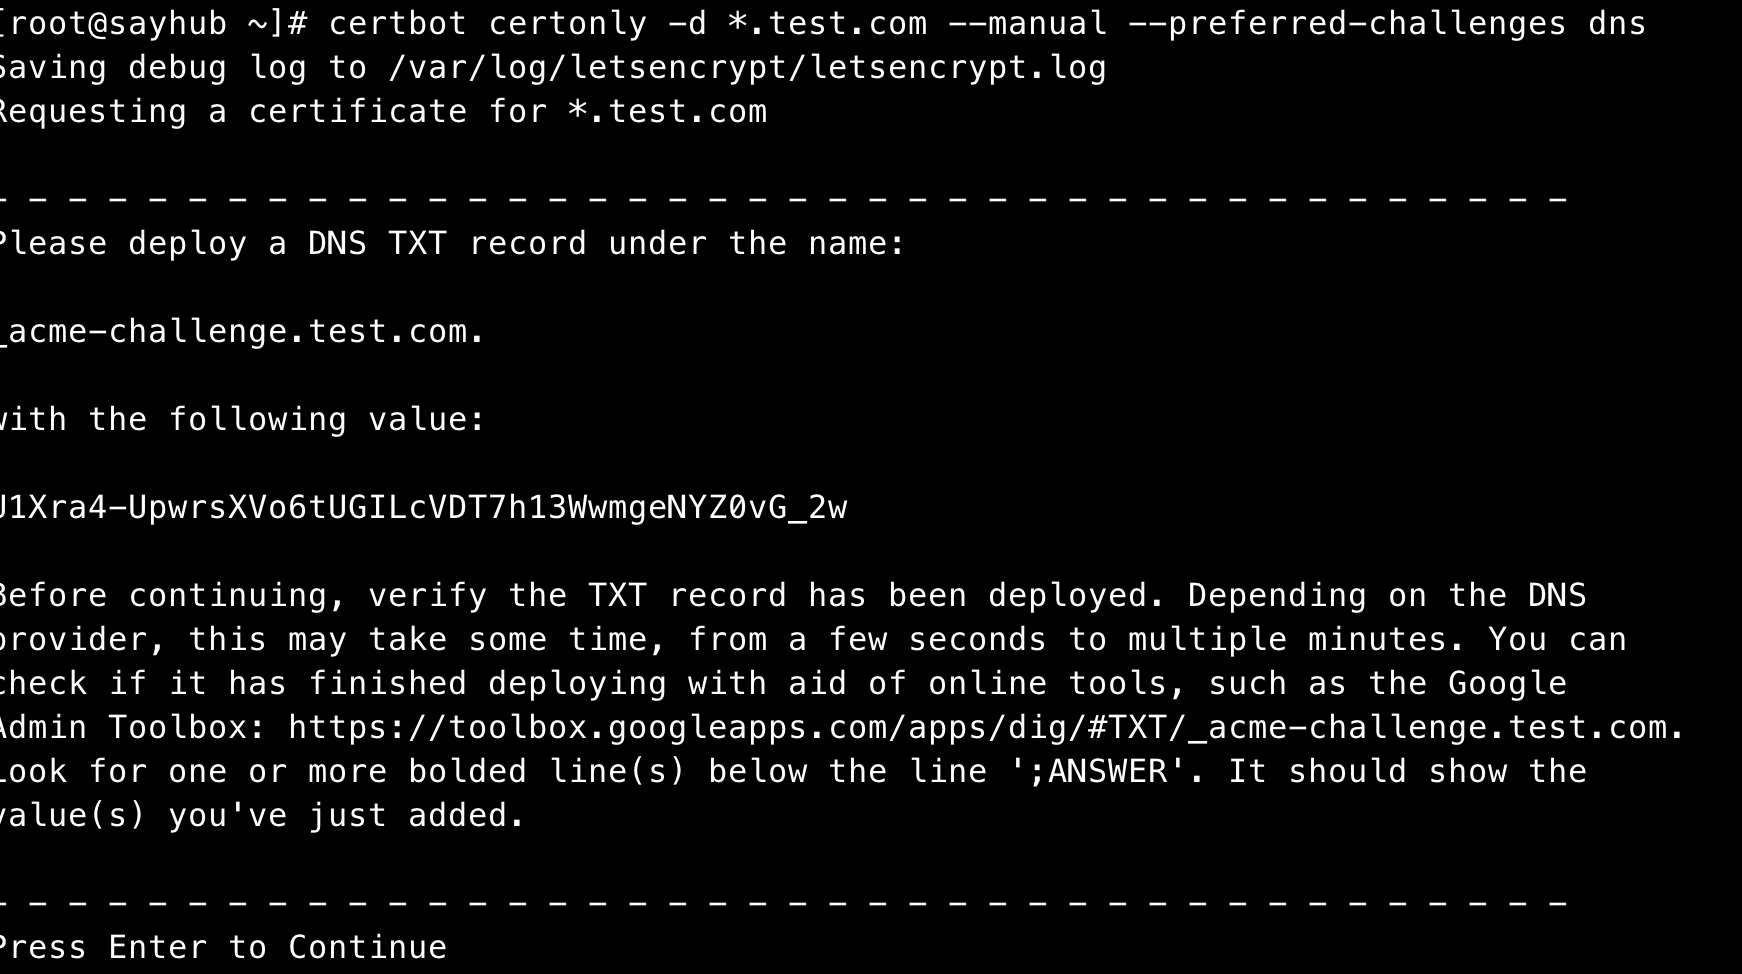
你需要按照提示,在你的域名服务商处,添加对应的 DNS TXT 解析记录。
配置好之后,按回车继续。
如果成功的话,它会生成两个文件:
/etc/letsencrypt/live/test.com/fullchain.pem/etc/letsencrypt/live/test.com/privkey.pem
nginx 配置
接下来配置 nginx 配置,我主要使用 nginx 代理我的前端项目,nginx 请自行安装。
我的 nginx 默认配置文件在 /etc/nginx/nginx.conf。当子域名很多的时候,这个文件就会很庞大,所以我把所有域名的配置都拆分到一个/etc/nginx/conf.d 文件夹。
以www.test.com 为例,在/etc/nginx/conf.d 文件夹下新建一个 www.test.com.conf 文件,内容如下:
server {    listen 443 ssl;    # 子域名    server_name  www.test.com;    # 这里是你证书的位置    ssl_certificate /etc/letsencrypt/live/test.com/fullchain.pem;    ssl_certificate_key /etc/letsencrypt/live/test.com/privkey.pem;    ssl_protocols TLSv1 TLSv1.1 TLSv1.2;    ssl_ciphers ECDHE-RSA-AES128-GCM-SHA256:HIGH:!aNULL:!MD5:!RC4:!DHE;    ssl_prefer_server_ciphers on;    root /usr/share/nginx/html;
    location / {      # 指向前端资源的路径      root   /home/webapps/test-app/dist;      index  index.html;    }
    error_page 404 /404.html;        location = /40x.html {    }
    error_page 500 502 503 504 /50x.html;        location = /50x.html {    }}
nginx.conf 配置如下:
http {    log_format  main  '$remote_addr - $remote_user [$time_local] "$request" '                      '$status $body_bytes_sent "$http_referer" '                      '"$http_user_agent" "$http_x_forwarded_for"';
    access_log  /var/log/nginx/access.log  main;
    sendfile            on;    tcp_nopush          on;    tcp_nodelay         on;    keepalive_timeout   65;    types_hash_max_size 2048;
    include             /etc/nginx/mime.types;    default_type        application/octet-stream;
    # 这里是防止别人恶意解析    server {       listen 80 default_server;       server_name _;       access_log off;       return 404;    }
    server {        listen 443  default_server;        server_name _;        ssl_certificate /etc/letsencrypt/live/test.com/fullchain.pem;        ssl_certificate_key /etc/letsencrypt/live/test.com/privkey.pem;        access_log off;        return 404;    }
# 这里配置强制把 http 转换成 https server { listen 80; server_name test.com; root /usr/share/nginx/html; return 301 https://$host$request_uri; } server { listen 80; server_name *.test.com; root /usr/share/nginx/html; return 301 https://$host$request_uri; } # 这里需要把之前拆分出去的配置引入进来 include /etc/nginx/conf.d/*.conf;}执行nginx -s reload,没问题的话,在浏览器输入域名,已经可以看到 HTTPS 的小锁了。
续期
Certbot 是申请的Let’s Encrypt的免费证书,有效期 3 个月,到期之后我们可以再次续期,达到永久免费的效果。
手动续期
你只需要在到期前,再手动执行生成证书的命令
certbot certonly -d *.test.com --manual --preferred-challenges dns再重复一下配置 DNS 解析的操作就 OK 啦。
自动续期
再说每次都手动配置 DNS 解析也挺烦的,如果域名很多就更麻烦了。
好在 certbot 提供了一个 hook,让我们可以编写一个 Shell 脚本。在续期的时候让脚本调用 DNS 服务商的 API 接口动态添加 TXT 记录,验证完成后再删除此记录。
这里推荐 @justjavac 大佬写的,https://github.com/justjavac/certbot-dns-aliyun
安装和使用指南可看 README。
生成也可以用:
# 泛域名certbot certonly -d *.test.com --manual --preferred-challenges dns --manual-auth-hook "alidns" --manual-cleanup-hook "alidns clean"续费命令:
# 续费命令certbot renew --manual --preferred-challenges dns --manual-auth-hook "alidns" --manual-cleanup-hook "alidns clean"然后再利用 crontab 定时任务,每天执行一下自动续期。
1 1 */1 * * root certbot renew --manual --preferred-challenges dns --manual-auth-hook "alidns" --manual-cleanup-hook "alidns clean" --deploy-hook "nginx -s reload"最后
还没有用上 HTTPS 证书?快来申请一个吧。还没有自己的服务器和域名?还不快去买一个。
加我微信 liruifengv2333,进群交流,抱团取暖。
- AI Agent 开发交流群(学习 Agent 开发,技术同学进)
- Astro 学习交流群(使用 Astro 开发网站的同学进)
-
OpenClaw 🦞交流群

关注公众号 瑞丰同学,带来更多原创内容。

很高兴见到你,欢迎来玩儿~